As you remember, I promised to prepare something special for SFT blog subscribers and members of our Facebook group instead of weekly promo campaigns. Today it is high time to start our first challenge!
On May 12, 2017, I published a poll asking about the topic for the first challenge. Based on the poll results, during this challenge we will create, develop and promote your Facebook page for business.

You can take part in the challenge by posting a link to your existing Facebook page for business HERE by the end of this week (until May 21). Also, add the number of likes you have before the challenge to track the progress.
If you don’t have a page yet, below you will find detailed instructions that will help you to start your first page and fill it with initially required information.
Do not bypass the instructions if you already have a page! You will definitely find some tips to improve your current page.
The challenge will be structured as follows:
- I will be publishing instructions related to a certain aspect of your Facebook page for business during the next several weeks.
- You will follow the instructions, ask questions (if any) and share what you have done in our Facebook group
- We will discuss the results of each stage in comments below this post so that each new member can easily find the discussion.
How to Create a Facebook Page for Business
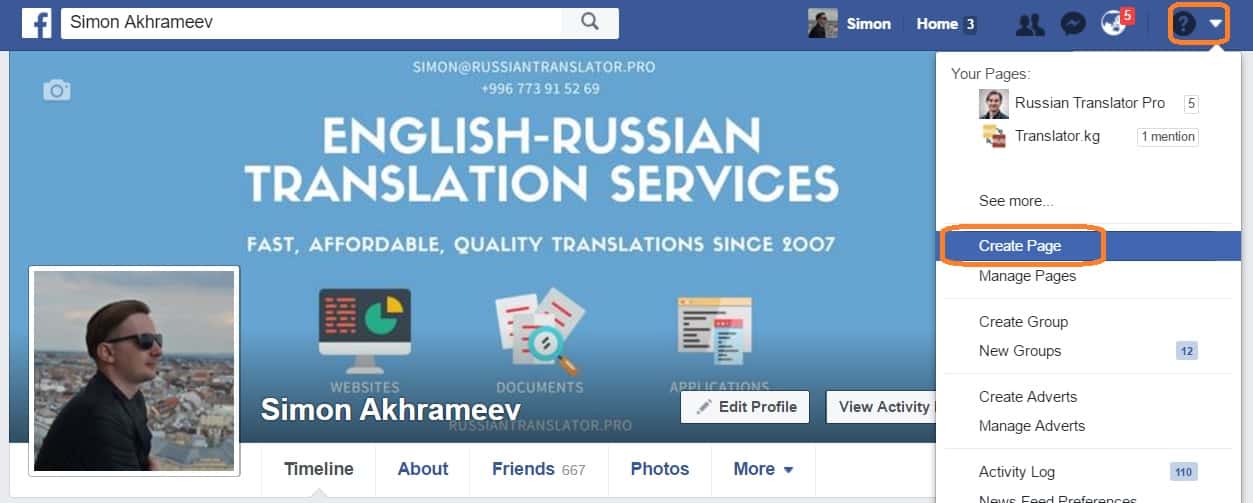
Log into your Facebook profile. Click a triangle icon next to Quick Help item in the upper left corner of the top menu. Choose Create Page option.
On the next page, you will need to select a page type. I recommend using Local Business option as it has a number of presets that are very useful for local business purposes. In addition, it will be easier to reach local customers and provide more information about your business than with any other type of pages.
If your target audience is located in another country, it is better to choose Company, Organization or Institution.
Facebook is developing a Global Pages feature that will become available to all users soon. Using this feature you will be able to create multiple pages for different markets and combine them into a single network.

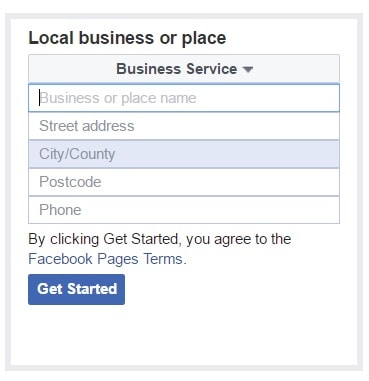
Then select Busines Service in the first line. Fill in other details like your business name, address, location and phone number. These fields are mandatory. You will be able to change your page name later, but I recommend to set it right from the very beginning.
If you already have a kind of brand name for your freelance business, you shall definitely use it as your Facebook page name to create a consistent online presence.
If you are just starting, consider the following when choosing a name for your business page:
- Use industry specific keywords in your page title (translation, translator, etc.)
- Consider your language pairs or target language (e.g. Russian Translator)
- Add your name if you want to tie up your business with your personal name (e.g. John Doe Translation Services)
- Alternatively, you can use branded approach (invented name for your business, e.g. QuickTrans or A-Z Translations, etc.)
Click Get Started when ready. You will be redirected to a newly created page. Now you can proceed with further settings.
Initial Settings for Your Facebook Page for Business
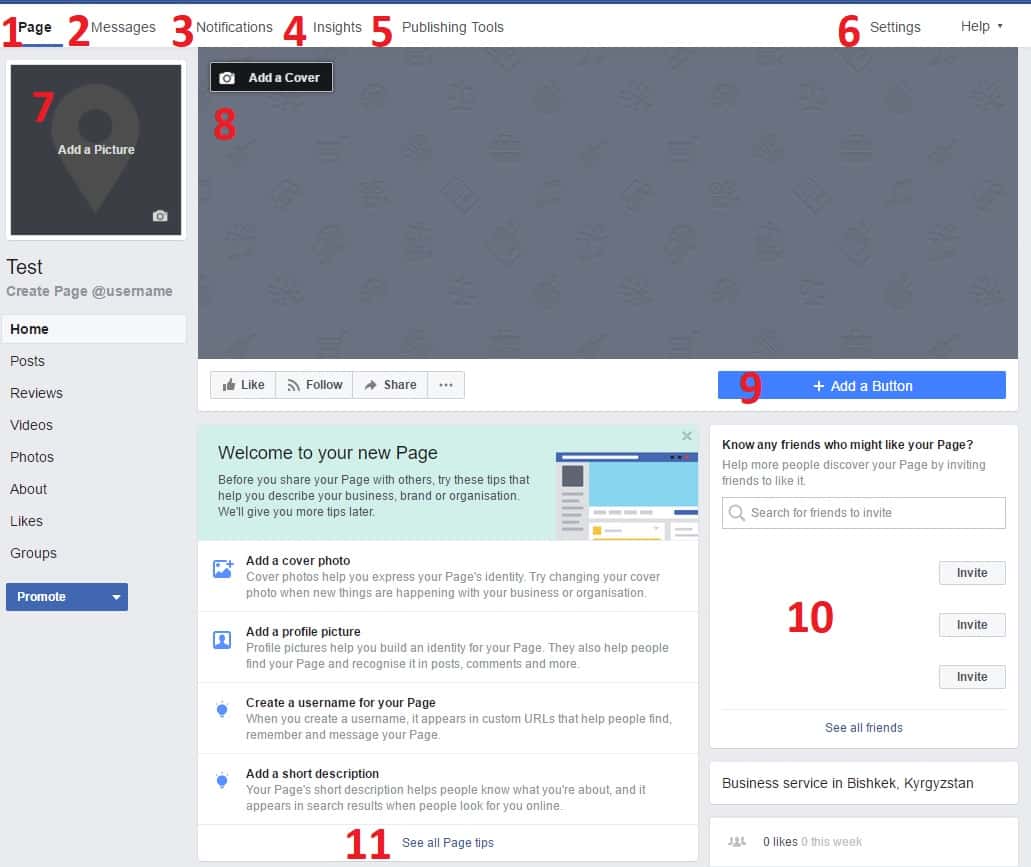
- Page tab is used to manage all aspects of your business page. Here you will find some tips and sections that will help make your page better.
- All messages received from page visitors will be stored in this section. You can also set up a response assistant for this section. We will get back to this option later.
- Everything that happens to your page will be displayed in the Notifications section: new likes, mentions, shares, etc.
- Insights section provides comprehensive analytical tools to keep track of your page performance.
- Publishing tools allow scheduling various posts to keep your page updated regularly even if you don’t have time to publish new content at this time.
- Settings section provides a deeper level of customization options. I will cover this topic in details later.
- This is a place for your logo or portrait photo. Think about your brand identity and decide which one is better. I use my personal photo for the international page (Russian Translator Pro) and a logo for my local translation bureau (Translator.kg).
- The Cover image is a perfect place to put important information about your business. Don’t use too much text here. It is better to select a descriptive image and add a short sentence covering your Unique Selling Proposition. You can read more about it in my previous post about personal branding for freelance translators. I use Canva to create cover images for my social profiles. You can take inspiration from these free beautiful templates.
- Call-to-Action button is a perfect way to help prospects contact you. Currently, you can choose between several options including some ordering applications offered by third party developers. It is hard to tell which call-to-action will work better for the page. Based on my observations 65% of my local customers use a mobile version of Facebook app and Call now button with my phone number is the best option in my case. You can test each of the provided options and find out which one is better for your business.
- In this field, you can invite friends to like your newly created page. Further, I will provide some tips on how to invite people to like your page even if they are not your friends.
- Click this links to see other tips provided by Facebook to improve your page performance. In addition to the above options, you will be able to add a username to help people find and mention your page using @UserName format, set up your business hours, add a link to your website, and fill in the section with a short description. Page tips will pop up from time to time in the right sidebar of your page if you have not used some of the available options yet.
Finally, go to About tab in a left sidebar menu to add some more details about your business:
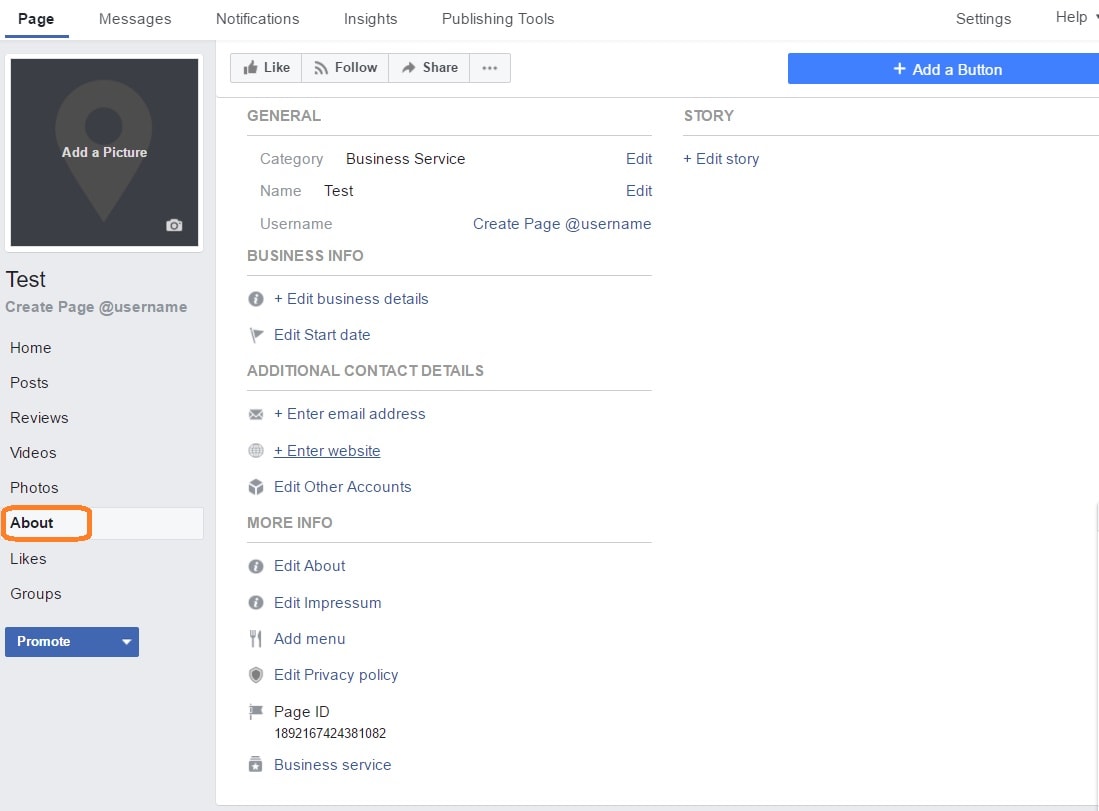
On this page, you can change your Facebook page category, name and username, add more details about your business and indicate the start date of your business. Click Edit link in the Category section and add Translator. Your page can have up to three categories.
In addition, you can provide such contact details as email address, website, and other relevant accounts, e.g. Instagram or Twitter. Also do not forget to prepare a copy for your Story, About and Impressum sections.
This is all for the start. I think this information is sufficient enough to start your first Facebook page for business the right way. In the next post, we will go into details about fine tuning your page with instructions about page layouts, privacy settings, messaging, page roles and so on. This way we will develop a perfect page for your freelance translation business.
When customization is done, we will proceed to the promotion of your page to help you spread the word about your business and find new clients.
When you set up your new page or make changes to your existing page using the above information, please, share your comments and questions below.
I will try to answer all of your questions.
Keep an eye on our Facebook group and get ready for the next step!
